Introduction
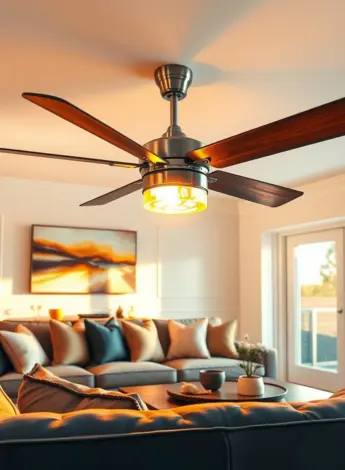
Harbor Breeze ceiling fans are known for their stylish designs, energy efficiency, and dependable performance. Installing one can be a straightforward process, even for a beginner, as long as you follow the right steps and take the necessary precautions. This guide will help you master the art of installing a Harbor Breeze fans, highlight the pros and cons of these fans, and provide information on where to find replacement parts.
Why Choose a Harbor Breeze Ceiling Fan?
Harbor Breeze fans are popular because they offer a combination of functionality and aesthetics. They come in various designs to suit different home decor styles, from sleek modern to rustic farmhouse looks. Additionally, their energy-efficient features can help reduce electricity bills while enhancing comfort.
Step-by-Step Guide to Installing a Harbor Breeze Fan
Tools and Materials Needed
Before you start, gather the following tools:
- Screwdriver (Phillips and flathead)
- Pliers
- Wire stripper
- Voltage tester
- Ladder
- Electrical tape
You’ll also need the fan installation kit, which typically includes mounting hardware, a canopy, blades, a motor, and instructions.
1. Turn Off Power to the Circuit
Safety is critical when working with electricity. Turn off the power at the breaker box for the circuit you’ll be working on. Use a voltage tester to ensure the wires are not live.
2. Assemble the Fan Components
Unbox your Harbor Breeze fan and assemble the motor housing, blade arms, and light kit (if included) as instructed in the manual. This step ensures everything is ready for quick mounting later.
3. Install the Mounting Bracket
Secure the mounting bracket to the ceiling electrical box using screws. Ensure the bracket is tightly fastened, as it will support the weight of the fan.
4. Wire the Fan
Carefully connect the wires:
- Match the black wire from the ceiling to the black wire on the fan (hot wire).
- Connect the white wires (neutral wires).
- Connect the green or bare copper wire (ground wire) to the fan’s grounding screw.
- If your fan has a light kit, connect the blue wire to the black wire from the ceiling.
Secure all connections with wire nuts and wrap them with electrical tape.
5. Attach the Fan to the Bracket
Mount the fan motor to the bracket and secure it using the screws provided. Once attached, check to ensure the motor is stable and level.
6. Install the Blades and Light Kit
Attach the fan blades to the motor using the provided screws, ensuring they’re evenly spaced. Install the light kit (if applicable) and connect the wires as instructed in the manual.
7. Test the Fan
Restore power to the circuit and test the fan. Check that the blades rotate smoothly and that the light kit functions correctly.
Pros and Cons of Harbor Breeze Ceiling Fans
Pros
- Affordable: Harbor Breeze fans are cost-effective compared to other premium brands.
- Variety of Styles: They come in a range of designs and finishes to complement any room.
- Energy Efficiency: Many models are Energy Star certified, reducing energy consumption.
- Easy Installation: The fans come with detailed instructions, making them suitable for DIY installation.
- Durability: Harbor Breeze fans are built to last, with high-quality materials and craftsmanship.
Cons
- Limited Availability: Harbor Breeze fans are typically available only at Lowe’s, limiting purchasing options.
- Replacement Parts Can Be Tricky: Finding specific replacement parts may require additional effort.
- Not Ideal for Large Spaces: Some models are better suited for smaller rooms and may not provide sufficient airflow for larger areas.
- Remote Control Issues: Some users report problems with remotes not functioning properly over time.
Where to Buy Harbor Breeze Replacement Parts
If you need replacement parts for your Harbor Breeze fan, you have a few options:
- Lowe’s: As the exclusive retailer of Harbor Breeze products, Lowe’s is the best place to find replacement parts. Visit your local Lowe’s store or their website to explore available parts like blades, light kits, or remotes.
- Harbor Breeze Customer Service: Contact Harbor Breeze’s support team for assistance with finding specific parts. They can guide you in ordering the correct components.
- Online Marketplaces: Websites like Amazon and eBay often have replacement parts for Harbor Breeze fans, including discontinued models. Ensure the part matches your fan’s model number.
- Third-Party Suppliers: Companies like Devine Lighting or CeilingFanParts.net specialize in ceiling fan parts and may carry Harbor Breeze components.
When purchasing harbor breeze replacement parts, always confirm compatibility with your fan’s model to avoid installation issues.
Maintenance Tips for Long-Term Performance
To ensure your Harbor Breeze fan lasts for years, follow these maintenance tips:
- Clean Regularly: Dust the blades and motor housing to maintain smooth airflow.
- Check Screws and Connections: Tighten screws and inspect wire connections periodically.
- Lubricate Moving Parts: Apply lubricant to the motor if recommended in the manual.
- Reverse the Fan Seasonally: Use the reversible motor feature to enhance comfort during different seasons.
Final Thoughts
Installing a Harbor Breeze fan is a manageable DIY project that can elevate your home’s comfort and style. By following this guide, you’ll ensure a smooth installation process and avoid common pitfalls. While Harbor Breeze fans offer many benefits, such as affordability and energy efficiency, it’s essential to consider their limitations and plan for maintenance or replacements.
Whether you’re looking to enhance airflow, improve energy savings, or add a stylish touch to your home, Harbor Breeze fans are an excellent choice. With the proper installation and care, your fan will serve you well for years to come!