Whether you’re throwing a birthday party, a wedding, or a baby shower, a balloon garland can be the perfect centerpiece to elevate your decor and wow your guests. While balloon garlands might look elaborate and professionally designed, the truth is, you can easily create one yourself! With a little time, creativity, and the right materials, you can craft a balloon garland that looks straight out of a Pinterest board.
In this guide, we’ll walk you through everything you need to know about making a DIY balloon garland and provide tips to make your event look like a show-stopper.
Why Choose a Balloon Garland?
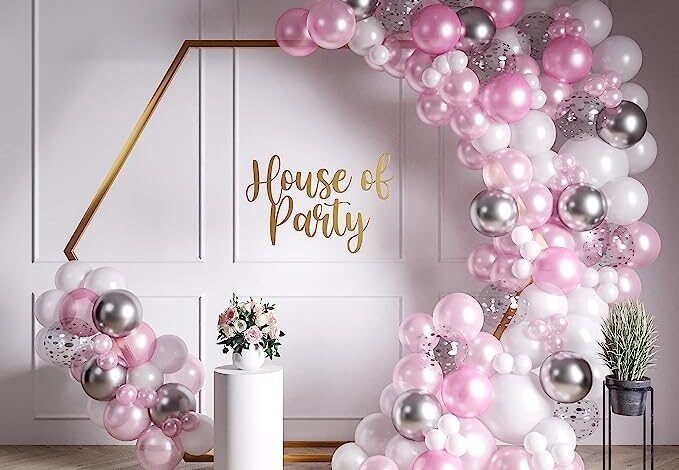
Balloon garland are one of the most versatile decorations you can add to your event. They’re customizable to any color scheme, theme, or event style, and they bring a sense of fun and elegance to any space. Whether you’re looking for a small garland to decorate a dessert table or a large installation to create a photo backdrop, balloon garlands fit any occasion. Plus, they’re relatively inexpensive to make compared to other elaborate decor options.
Materials You’ll Need for a Balloon Garland
Before getting started, here are the materials you’ll need to create your balloon garland:
- Balloons – Choose balloons in varying sizes (5”, 10”, 12”, or larger) for dimension and texture. Pick colors that match your theme.
- Balloon Tape or Garland Strip – This is a plastic strip with pre-punched holes where you insert the knotted ends of your balloons.
- Balloon Pump – A hand or electric balloon pump will save you time and energy when inflating dozens of balloons.
- Glue Dots or Balloon Adhesive – These will help secure small balloons into gaps and add finishing touches.
- String or Command Hooks – You’ll need these to hang your balloon garland once it’s complete.
- Optional Extras – Add some greenery, flowers, or metallic balloons for extra flair.
Step-by-Step Guide to Creating a Balloon Garland
Here’s a simple, step-by-step process to create a DIY balloon garland.
Step 1: Choose Your Color Scheme and Balloon Sizes
Before you start inflating balloons, decide on your color palette. Whether you’re going for a pastel rainbow, earthy tones, or a glamorous metallic scheme, having a clear color vision is crucial. Also, choose at least three different balloon sizes to create depth in your garland. Larger balloons form the base, while medium and small balloons will fill in gaps and add variety.
Step 2: Inflate Your Balloons
Using your hand or electric pump, inflate all your balloons. Don’t worry if they’re not perfectly round; a little variety in shape and size adds interest. You should have a mix of small, medium, and large balloons to play with.
Pro Tip: Inflate balloons to different sizes, even if they’re the same size out of the package. For instance, a 12” balloon can be blown up to 9” or 10” to create a more dynamic look.
Step 3: Attach Balloons to the Balloon Tape
Once all your balloons are inflated, start attaching them to the balloon tape or garland strip. Insert the knotted end of each balloon into the pre-cut holes of the balloon tape. Alternate between large, medium, and small balloons to create a balanced look.
For example, start with a large balloon, then attach a medium one next to it, followed by a small one. Continue adding balloons until the garland reaches your desired length.
Pro Tip: Don’t be afraid to overlap balloons slightly. The more layered and clustered the balloons are, the fuller and more professional your garland will look.
Step 4: Fill in Gaps with Smaller Balloons
Once your main balloon garland is assembled, use glue dots or balloon adhesive to attach smaller balloons into any gaps in the garland. This is where you can get creative! Add mini balloons in contrasting or complementary colors, or use specialty balloons like metallic or confetti-filled ones.
Pro Tip: Turn your garland into a statement piece by adding fresh or faux flowers, leaves, or other decorative accents between the balloons.
Step 5: Hang Your Balloon Garland
Now that your garland is ready, it’s time to hang it. There are several ways to display your balloon garland:
- Over a doorway: Attach string or command hooks to the doorframe and drape your garland across the top.
- Above a dessert table: Use string to suspend the garland from the ceiling, positioning it above the table for a striking visual.
- As a photo backdrop: Command hooks or nails in the wall can hold your garland in place for an Insta-worthy backdrop.
Adjust your garland’s position as needed, and secure any areas that feel loose with extra string or hooks.
Tips for Creating a Professional-Looking Balloon Garland
Creating a DIY balloon garland may seem simple, but there are a few tips that can take your garland from basic to breathtaking:
1. Use a Variety of Balloon Sizes
The key to a visually appealing balloon garland is using different balloon sizes. A mix of large, medium, and small balloons creates depth and makes your garland look fuller and more dynamic.
2. Don’t Overfill Your Balloons
It might be tempting to blow up balloons to their maximum size, but slightly under-inflating them will create a rounder, more aesthetically pleasing shape. Plus, overfilled balloons are more likely to pop.
3. Add Extra Elements
Greenery, flowers, tassels, and metallic or confetti-filled balloons are great ways to make your balloon garland stand out. These extra elements break up the monotony of the balloons and add a touch of sophistication.
4. Play with Placement
You don’t have to hang your garland in a straight line! Try creating a cascading effect by having one end of the garland higher than the other, or drape it in a curve or semi-circle for a more creative shape.
5. Keep the Event Theme in Mind
Whether your theme is rustic chic, boho, or ultra-modern, tailor your balloon colors and styles to match the vibe. Pastel colors work well for a whimsical, romantic look, while bold colors or metallics are perfect for a glam celebration.
Conclusion
Creating a DIY balloon garland doesn’t have to be intimidating! With the right materials, a bit of patience, and a dash of creativity, you can craft a stunning show-stopping centerpiece for your event. By following these easy steps, you’ll be able to make a balloon garland that’s just as beautiful as any professional setup—and at a fraction of the cost.
Whether you’re decorating for a birthday, a wedding, or any other celebration, your DIY balloon garland will be the talk of the event and the perfect backdrop for all those party photos!
So, grab your balloons, unleash your creativity, and get ready to impress your guests with a show-stopping balloon garland!