In today’s digital age, our homes are filled with an abundance of electronic devices, from TVs and computers to gaming consoles and speakers. While these devices bring convenience and entertainment into our lives, they also come with a downside—unsightly cables that clutter our living spaces. Fortunately, innovative cable covers offer a solution that not only organizes and conceals cables but also enhances the overall aesthetic of your home décor. In this article, we’ll explore how you can elevate your space with sleek and stylish cable covers.
Step 1: Assess Your Cable Management Needs
Before diving into the world of cable covers, take some time to assess your cable management needs. Identify areas in your home where cables are visible and causing clutter. This could be behind your TV stand, along the baseboards, or on your desk. By pinpointing these trouble spots, you can determine which types of cable covers will be most beneficial for your space.
Step 2: Choose the Right Type of Cable Cover
There are various types of cable cover available, each designed to address specific cable management challenges. Consider the following options:
- Floor Cord Covers: Ideal for concealing cables running along the floor, floor cord covers come in various profiles to minimize tripping hazards.
- Wall Cord Covers: Perfect for hiding cables that run along walls or baseboards, wall cord covers provide a seamless and integrated look to your room.
- Desk Cable Organizers: If you have a home office or workstation, desk cable organizers can help keep your workspace clutter-free by managing cables from your electronic devices.
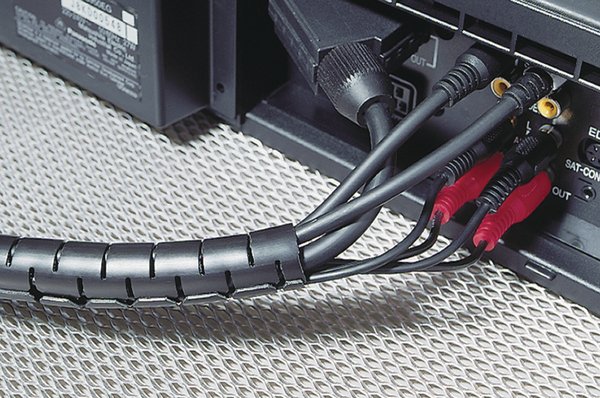
- Cable Sleeves: Made from flexible materials like neoprene or fabric, cable sleeves wrap around bundles of cables to provide a sleek and streamlined appearance.
Choose the type of cable cover that best suits your needs and complements your décor style.
Step 3: Measure and Prepare Your Space
Before installing your chosen cable covers, measure the length of the cables you’ll be covering and the area where they’ll be placed. This will help you determine how much material you’ll need and ensure a proper fit. Additionally, clean the surface where the cable cover will be installed to remove any dust or debris that could affect adhesion.
Step 4: Install the Cable Covers
Depending on the type of cable cover you’ve chosen, installation methods may vary. Follow these general steps for installing common types of cable covers:
- Floor Cord Covers: Peel off the adhesive backing and carefully press the cover onto the floor, ensuring it lies flat and securely covers the cables.
- Wall Cord Covers: Use screws or adhesive strips to attach the cover to the wall, following the manufacturer’s instructions for proper installation.
- Desk Cable Organizers: Place the organizer on your desk and feed the cables through the designated channels or slots to keep them neatly organized.
- Cable Sleeves: Slip the sleeve over the bundle of cables, ensuring a snug fit. Use zip ties or Velcro straps to secure the ends and prevent the sleeve from slipping.
Step 5: Enjoy Your Tidy and Stylish Space
Once your cable covers are installed, step back and admire the transformation of your space. Gone are the days of unsightly cables cluttering your home—now, you can enjoy a clean and streamlined environment that enhances your décor and reduces visual clutter. Sit back, relax, and enjoy the sleek and stylish look of your newly organized space, thanks to innovative cable covers.
In conclusion, cable covers offer a practical and stylish solution to cable management woes, allowing you to enhance your décor while keeping your space organized and clutter-free. By following these steps, you can effortlessly elevate the aesthetic appeal of your home while enjoying the benefits of a tidy and streamlined living environment.